Introduction
Within this weeks project it was to create our own version of a top down shooter game. A top down shooter game mainly refers to the camera angle in comparison to the player. The camera being on top looking directly down onto the player whilst being able to use the mouse to aim and shoot at the enemy.
Making Monster Store
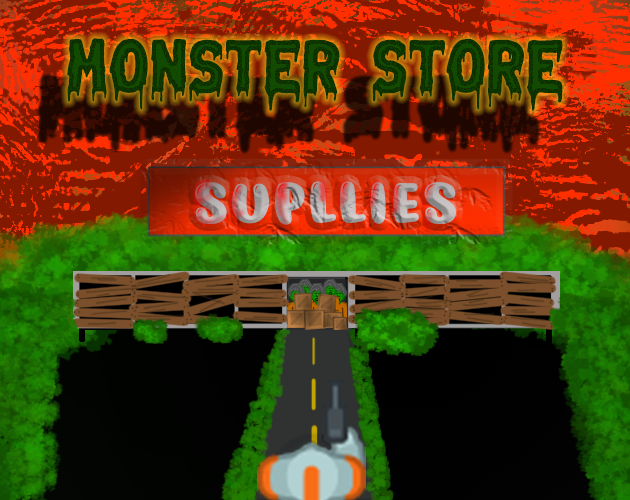
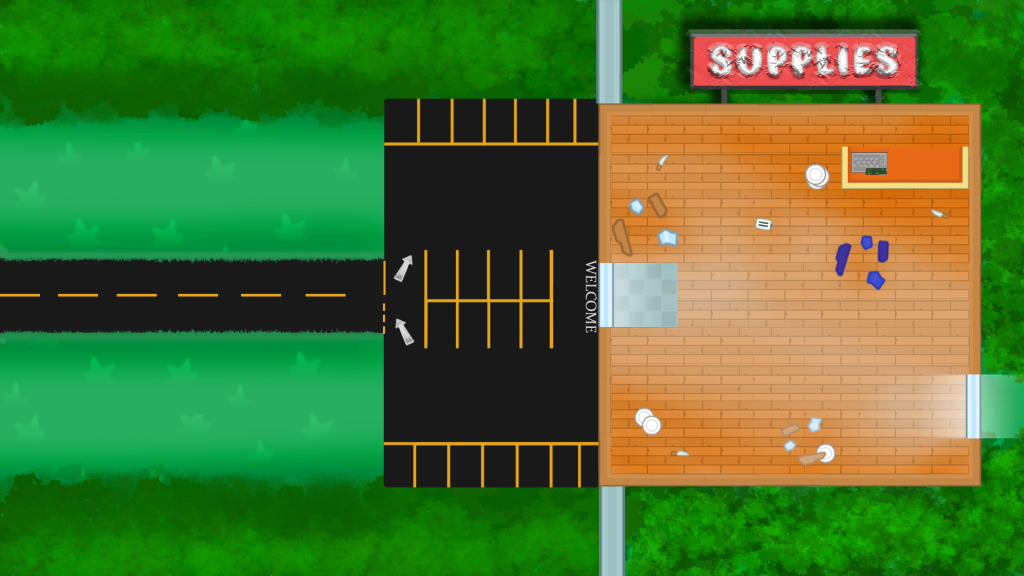
For this game I thought the main idea would be for the player to find and access the supply store in order to survive the zombie apocalypse! However, once the player figures out how to access the store a hoard of zombies will come after the player and the only way to survive is to shoot your way out and find the exit!
Artwork
I took a much different approach to this project as I have my others by using Photoshop to create my scene and then applying empty objects with colliders within Unity to create the effect the 2D objects I made in the scene have psychical impact. Doing this once again I probably spent more time than I should have but overall I think it’s visually appealing and brings across the genre of game really well.
Scripting
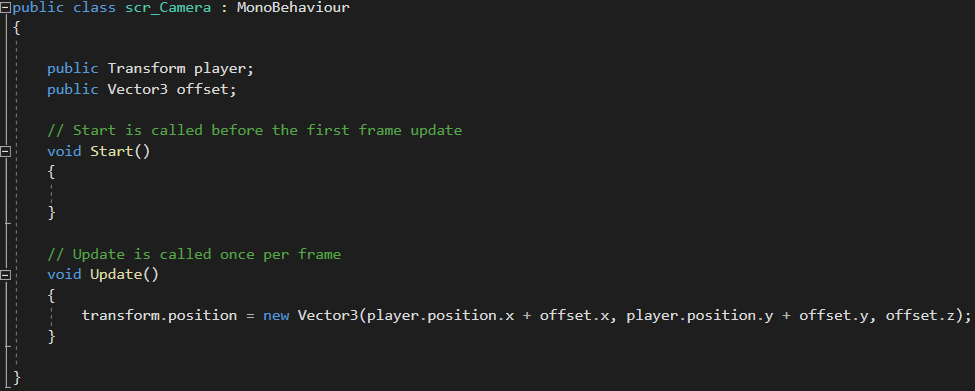
Camera Script
For this top down shooter I thought it would be a good idea to add a bit of mystery to the overall scene. With the background that I added empty objects to – I made sure it was bigger than the main camera could view therefore leaving parts of the level unexplored. So with this idea I had to create a script for the camera to follow the player regardless of the players position. To do this I needed access to the transform component of the player as well as a Vector3 variable. As the player would be moving, in ‘void Update’ I would need to make sure the camera is following the player at all times be basically changing the camera position to the position of the player by using the offset variable I set earlier.
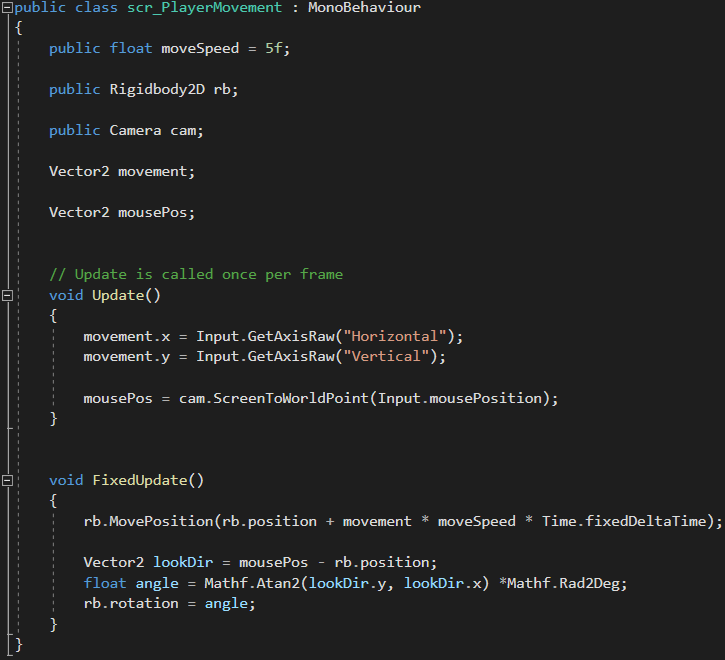
Player Movement Script
For the player movement script firstly I needed to input a few variables. I created a public float so that I could have control of the movement speed of my player. Within Unity I placed a Rigidbody2D component onto my player giving it a some degree of physics. once in Visual Studio I made a variable to get access to this and called it ‘rb’. For the camera I only needed to create a variable to call upon it at the start of the game. The final 2 variables are called Vector2, similar to Vector3 but as I only need access to the x and y axis Vector2 will be more appropriate. then then were named accordingly for the two main movements of the player being; movement and the mouse position.
I didn’t need void start so firstly I removed that from the script as when its to do with movement and aiming we want the game to check every frame whether an input of movement has been detected. To get access to the movement of the player object along an axis I used ‘Input.GetAxisRaw(..’ which will detect if the movement keys on the keyboard are being pressed. With entering both of them we can also move diagonally if both keys are pressed giving the player move freedom of movement. Finally, I needed to make sure that I could move the mouse within the scene for the game to understand. so we set the earlier Vector2(mousePos) to ‘cam.ScreenToWorldPoint’ followed by the input required being the mouse position.
In order to get the player to move I needed to access the earlier Rigidbody2D component and say that the ‘(rb.position + movement * moveSpeed * Time.FixedDeltaTime)’. This function controls all the Rigidbody components we need as well as the interval in seconds at which physics and other fixed frame rate updates. To get the player to aim in the direction of the mouse I used an inbuilt function called ‘lookDir’, then used that to determine the position. When scripting if dealing with maths functions we use ‘Mathf’ which from that we can implement angles and degrees which is what our player will be using to rotate.
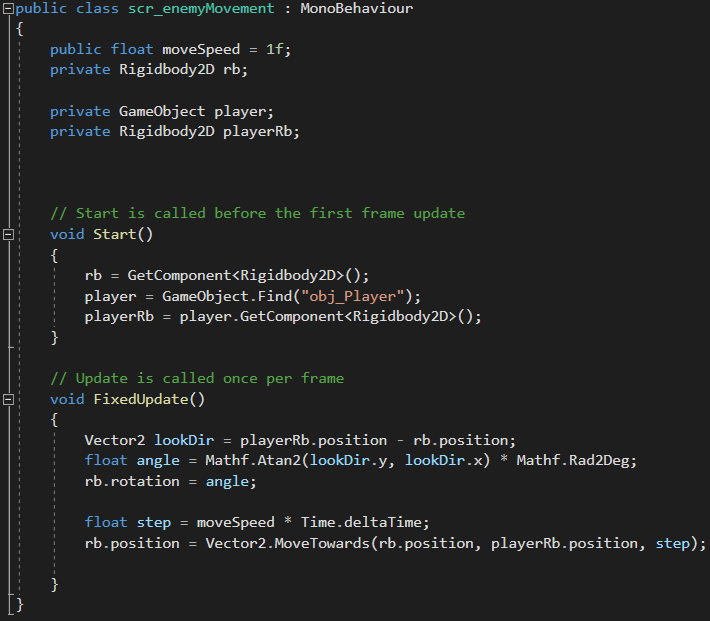
Enemy Movement Script
For the enemy movement its a very similar script to the player movement with a few differences. Firstly, just like the other script I referenced a few variables to get access to the player object, speed etc.
At the start of the game I want to call upon the Rigidbody2D component again. Following that we can tell the enemy that we want to find the player object within unity as well as then accessing the players Rigidbody2D component.
In our FixedUpdate section of the script we have copied our look direction script from the player movement script as we need to get access to the same components on both. I input a ‘float step’ which essentially allows for smooth movement for the object and then that object would need to be given a speed and the ‘Time.deltaTime’ function. For the final step I needed the enemy to move towards the player so by using a Vector2 to control x and y axis as well as the ‘MoveTowards’ function, I was able to achieve this .
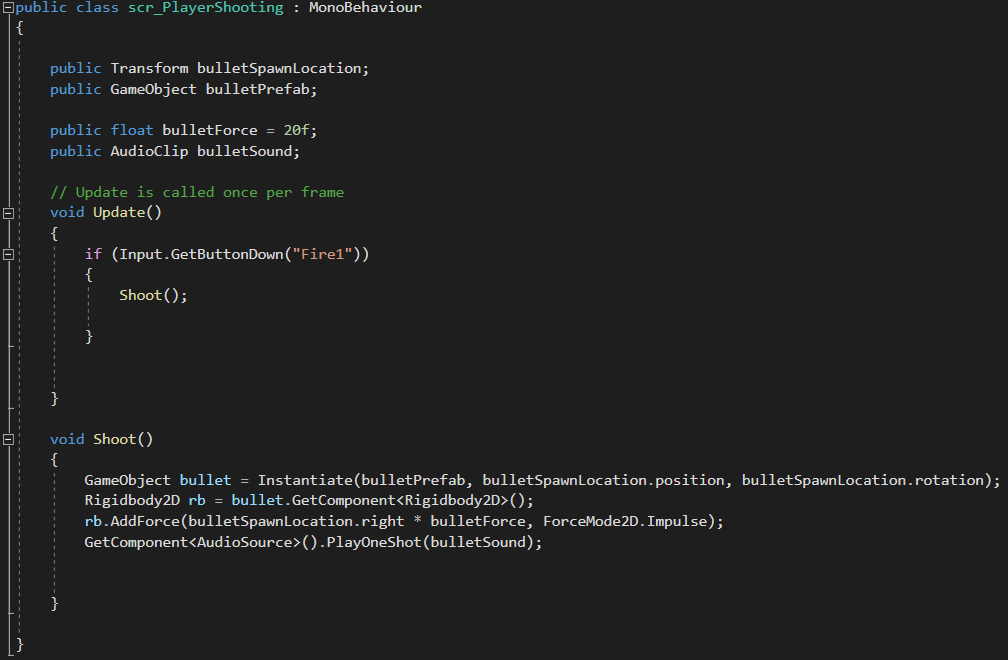
Shooting Script
First of all within Unity an empty object was placed and was called ‘bulletSpawnLocation’ which then was attached to the players gun to simulate the gun spawning(shooting) bullets.
So within the variables we get access to the transform component on that location as well as the bullet prefab. Once that’s done the bullet needs some sort of force and sound to make it more immersive.
As shooting we want to be done by pressing the left button on the mouse the ‘GetButtonDown’ works perfectly for this scenario. Used within an ‘if’ function we can then make the part of the script for shooting.
I created a ‘void Shoot()’ function in which the following is used to spawn and apply force to the bullets. Calling upon the ‘bullet’ game object I used Instantiate to spawn the bullet from the spawn location set earlier. Then by accessing the bullets Rigidbody2D component I can apply a force by using ‘AddForce’ and ‘ForceMode2D.Impulse’ which applies force instantly when spawned and takes the mass of the object into account. Finally, I can add the audio of the shooting script by using the ‘PlayOneShot’ function.
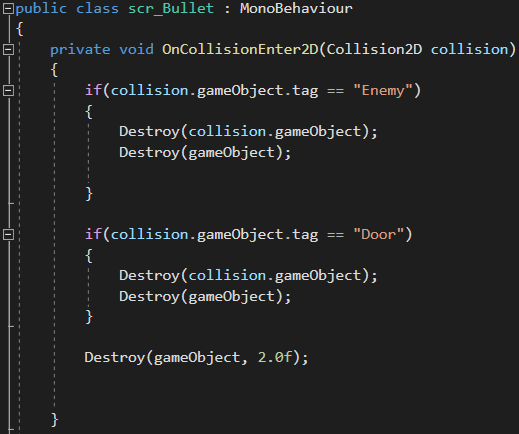
Bullet Script
So for the bullet script this will mainly depend on the actions of the bullet and other objects when they collide. With the ‘OnCollisionEnter2D’ function I can use two ‘if’ statements to determine whether the conditions have been met. Firstly a tag was added the the enemies called ‘Enemy’. If a collision was to happen between the bullet and the enemy then both objects would be destroyed using the ‘Destroy’ function. As I didn’t want the enemies to attack straight away I applied a border between the enemy and the player which require the player to shoot at before access to the rest of the game. so within Unity I added two box objects both with the tag ‘Door’ so that when destroyed the enemy would come chasing. Lastly, as the scene would become overflown with bullet objects as they do not destroy when not hitting the tagged objects. I used the ‘Destroy’ function again but this time a float value can be added to it to add a time to be destroyed at. Another way to approach this would be to destroy the bullet once its reached a certain distance from the player but I found this method more suitable.
Challenges
For this project there were a few challenges I faced within the scripting itself. With still learning how scripting works its become very clear that things need to be in the right place in the right order or the game won’t run as intended. Some carless missing capitals and semi-colons cost me some valuable time. With the movement around the scene itself I found a few spots in the empty objects I created that the bullets could pass through allowing you to shoot them before they chase. I have still not figure this out and in future I shall just be using sprites I add within the assets rather than creating the full scene to then add objects on top of. Although I like the artistic look it needs to be more focused of the gameplay itself.
How Could It Progress
So the initial idea for the game was to have multiple levels once you had left the supply store itself following onto more difficult tasks ahead. That is still where I can see this game progressing to with adding more features such as a scoring system and maybe add health elements to the enemies to possibly make more difficult enemies to kill within the game. Following on from this I could essentially build a story line around it and turn it into a survival game in which you had to see how long you could survive in the apocalypse. With some extra time and attention to detail I feel this has great potential to become a great top down shooter!
Referenced material:
Kenney (2016) Kenney • Topdown Shooter. www.kenney.nl. Available online: https://www.kenney.nl/assets/topdown-shooter [Accessed 26 Oct. 2021].